Veamos lo que llevamos hecho hasta el momento
Tan solo llevamos cuatro lecciones y verás como ya va tomando forma la página web. Por el momento hemos conseguido crear lo siguiente:
Con el código html de la página (plantilla.html):
<html>
<head>
<title>Titulo de tu pagina : PONER SECCION</title>
<meta http-equiv="Content-Type" content="text/html; charset=iso-8859-2">
<link href="estilo2.css" media="screen" rel="StyleSheet" type="text/css">
</head>
<body bgcolor="#FFFFFF">
<!---- Principio Tabla Primera ---->
<table class="ancho99" width="99%" border="0px" cellspacing="0px" cellpadding="0px">
<tr>
<td class="a1">Logotipo</td>
<td class="a2">Banner</td>
</tr>
</table>
<!---- Principio Tabla Segunda ---->
<table class="ancho99" width="99%" border="0px" cellspacing="0px" cellpadding="0px">
<tr>
<td class="b1">titulo</td>
<td class="b2">ruta</td>
<td class="b3"><img src="atras.gif" width="13px" height="19px"> <img src="adelante.gif" width="13px" height="19px"></td>
</tr>
</table>
<!---- Principio Tabla Tercera ---->
<table class="ancho99" width="99%" border="0px" cellspacing="0px" cellpadding="0px">
<tr>
<td class="c1">
<p>menu</p>
</td>
<td class="c2">
<p>contenido</p>
</td>
</tr>
</table>
<!---- Principio Tabla Cuarta ---->
<table class="ancho99" width="99%" border="0px" cellspacing="0px" cellpadding="0px">
<tr>
<td class="d1">contador</td>
<td class="d2">opciones</td>
<td class="d3"><img src="atras.gif" width="13px" height="19px"> <img src="adelante.gif" width="13px" height="19px"></td>
</tr>
</table>
<!---- Principio Tabla Quinta ---->
<table class="ancho99" width="99%" border="0px" cellspacing="0px" cellpadding="0px">
<tr>
<td class="e1">Actualizada el <!-- #BeginDate format:fcEn2 -->Sábado, 20-Jul-2002<!-- #EndDate --></td>
<td class="e2">hueco</td>
<td class="e3">Creada por <a href="mailto:tucorreo@wanadoo.es">Fulano</a> ©</td>
</tr>
</table>
</body>
</html>
junto con la hoja de estilo siguiente (estilo2.css):
table.ancho99 {width:99% ;}
td.a1{ background-color: white ; width: 150px ; text-align: center ; }
td.a2{ background-color: white ; text-align: center ; }
td.b1{ background-color: #0EBEBA ; width: 150px ; font-weight: bold ; text-align: center ; }
td.b2{ background-color: #0EBEBA ; font-weight: bold ; color: #000080; text-align: center ; }
td.b3{ background-color: #0EBEBA ; width: 50px ; text-align: center ; }
td.c1{ background-color: #9ED7D7 ; width: 150px ; font-weight: bold ; text-align: center ; }
td.c2{ background-color: #F6DA98 ; text-align: justify ; }
td.d1{ background-color: #0EBEBA ; width: 50px ; text-align: center ; }
td.d2{ background-color: #0EBEBA ; font-weight: bold ; text-align: center ; }
td.d3{ background-color: #0EBEBA ; width: 50px ; text-align: center ; }
td.e1{ background-color: white ; width: 150px ; font-weight: bold ; text-align: center ; }
td.e2{ background-color: white ; font-weight: bold ; text-align: center ; }
td.e3{ background-color: white ; width: 150px ; font-weight: bold ; text-align: center ; }
Hemos conseguido esto:
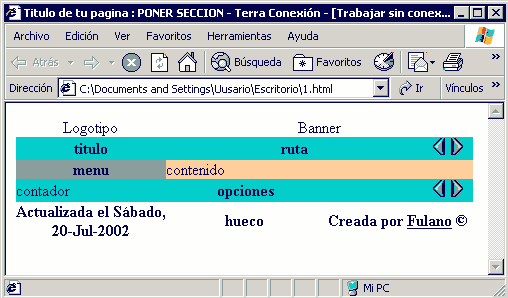
Aunque parezca un poco rara no te preocupes, en la lección siguiente le vamos a incluir un menú común para todas las páginas e insertaremos algo en el contenido central. Verás como al llenarla va tomando mejor aspecto.
También veremos en la siguiente lección como escoger las características que deseamos para los enlaces de nuestra página web, es decir, como hacer para que los enlaces aparezcan de otro color y sin subrayado, por ejemplo. Anímate y nos leemos en la lección V.
Lección IV:

